

Wednesday 15 July 2020
Life After Lockdown & How It's Changed Me

I suppose I am one of the "lucky ones" as I have managed to stay working from home full time for the whole of the lockdown. With working full time and my own projects, I've stayed quite distracted from the whirlwind of negative news and brain numbing boredom. That's not to say it's been easy though.
Who would have thought we'd be spending 2020 like this?
Like many, I've been separated from family and desperately regretting not getting all of the grandparents set up on the millennial crazed FaceTime before this pandemic (but then who would have thought we'd be spending 2020 like this?). I've kept up regular phone calls, but it's not quite the same as seeing them smile in person and them seeing for themselves that we're doing OK. Throughout the pandemic, the safety of my loved ones has been at the forefront of my worry and I knew I'd have to stay away for precisely that reason.
The socially distanced new normal does lead me on to wonder how we'll be as a society moving forward. Will I wince every time someone gets too close to me in public? How will I feel now getting on public transport knowing the likelihood of the virus spreading in such close proximity? When will I stop feeling guilty for touching my loved ones? What do I do in a professional environment if somebody reaches out politely for a handshake? Will I ever feel fully comfortable wearing a mask even though I should?
We've had the opportunity to slow down and realise what truly matters. Before this, our modern world was crammed full of stressful commutes, overtime, hectic crowds, selfishness, greed, air pollution and a constantly buzzing mobile phone.
Despite it all, a big learning curve has come from this experience that we can all learn from. We now appreciate our NHS teams and key workers more than ever (and rightly so). We remember to check in more often with our loved ones and those living on their own. We now know (hopefully) how to wash our hands to the tune of Happy Birthday, twice. We've had the opportunity to slow down and realise what truly matters. Before this, our modern world was crammed full of stressful commutes, overtime, hectic crowds, selfishness, greed, air pollution and a constantly buzzing mobile phone. I've realised just how fragile life can be and how important it is to spend your time investing in yourself, your home, your health and your loved ones.

This post contains affiliate links.

Friday 19 June 2020
Comforting Soft and Chewy Flapjacks Recipe

Since spending more time at home, I've been on a baking craze. This is my favourite basic flapjack recipe for making soft yet chewy golden flapjacks. These are truly the melt in your mouth kind! Not guilt free, but a lovely sweet treat to share with loved ones over a cup of tea.
Ingredients
250g porridge oats
185g baking margarine
185g baking margarine
100g light brown sugar
100g golden syrup
Equipment you'll need
1x 20x30cm baking tray
1x medium saucepan
A wooden spoon
Baking paper
Weighing scales
Prep time: 10 mins
Baking time: 20 mins
Oven setting: 160 degrees or gas mark 3
Instructions
Firstly, line your tin with baking paper. I cut diagonal slits in each corner of the baking paper (about the same depth as the tin) so that it can be easily folded to fit the shape of the tin. Before you start preparing, be sure to set your oven to 160 degrees.
In a large saucepan, melt the 185g baking margarine, 100g light brown sugar, and 100g of golden syrup. Heat gently, stirring occasionally until melted. Once melted, take the saucepan off the heat and fold in your 250g porridge oats. Once fully bound together, pour out the mixture evenly into your tin and spread evenly with the back of your wooden spoon or spatula.
Bake in the oven for 20 minutes. When ready, take them out of the oven and allow the flapjacks to cool before cutting into squares.

Tuesday 16 June 2020
My Care Tips for Cut Peonies


From buds to blooms
Before they go for another year, I thought I'd pull together my top tips for how I get the most out of my cut peonies. If you've bought or grown peonies before, you'll know they begin as tightly formed buds, typically covered in a little sap. Within a few days, they'll begin to blossom into big bountiful blooms and give you the biggest surprise. Peony buds can actually expand 3x the size of the bud once fully opened up. Don't worry if the buds have a few dark spots or look a little stained, this is completely normal. You can encourage your buds to open if you're growing impatient by gently wiping the sap off with a damp cloth and placing in a warmer sunnier spot.
Keep them for longer
Although stunning, peonies tend to last for around 5 days or more once cut and placed in an arrangement. To help your peonies last longer, keep them cool in cold water when you first bring them home or cut them from your garden. Prepare them for arranging by stripping the leaves below the waterline or further up depending on your desired style. Cut the stems 3-5cm from the bottom in a diagonal chop. This will help the peonies absorb more water as soon as they get put into the vase. After three days, trim the stems down a few cm again and top up the water. Remove any petals that may look brown, dead or mushy as these will rapidly encourage your peonies to go over.
Clean vases for happier blooms
Ensure you have a clean vase ready as any bacteria may cause the peonies to die off quicker than normal. Fill your vase with cool water and mix in flower food to give the flowers the best chance for surviving indoors for longer.
Where to buy?
You could partner your peonies with other flowers, such as roses, lisianthus, or freesias for a seasonal bouquet or enjoy them as a stand alone statement. You can usually buy peonies in the supermarket with your weekly shop but if you're currently unable to go due to the lockdown rules, you can also order them as letterbox delivered flowers online from websites such as Bloom&Wild. For £10 off your first Bloom&Wild order, click here.

This post includes affiliate links.
Sunday 3 May 2020
How I Stay Fit and Motivated at Home

Since having to turn our homes into libraries, offices, yoga studios and gyms all in one go, it's harder than ever to stay fit and motivated at home. If you're looking for ways to stay active indoors or if you're a fellow gym-goer who's now needing to get creative to stay active, I can help. First of all, plan your day. Filling your time, goal setting, and sticking to your schedule will lead you to feel more productive and satisfied. While planning my own day at home, I factor in the following points to keep me active and feeling energised...


Morning Yoga
Every morning, I'll lay out my yoga mat in my living room. I'll ask Alexa to play calming music and I'll stretch my body into yoga poses. I typically do this for 30 minutes, sometimes longer or sometimes less. Some days, you'll feel a lot more able than others - able to spend more time, able to feel the stretch, or able to hold that pose for a little longer. Don't let this stop you, because it is completely normal and the more you practice the more you'll improve in the longer term. Adding yoga into your morning routine gently wakes up your body, it frees your mind for motivation, and it sets a positive tone for your day.
Practice Mindfulness
I'm sure we can all count times in the past few weeks where we have felt completely overwhelmed by everything that's going on around us. Whenever I feel overwhelmed by my worries, I'll set aside five minutes to focus on my breathing and calm my mind. My favourite way to do this is to sit cross legged on the floor. Place your hands comfortably out in front of you or softly place them on your knees. Close your eyes, and take a deep breath in through your nose, hold that breath for two seconds, then slowly breathe out through your mouth. Repeat this for a few minutes, allowing your mind to solely focus on your breathing. Once you feel ready to return to your day in a calmer state, open your eyes and slowly come out of the position. After doing this exercise, take note of how you felt before and after. Be sure to set aside time for it in your daily schedule.
Workout at Home
Working out makes you feel active and alive, it's no different when you're doing it at home. After finishing my tasks for the day, I'll change back into my favourite activewear outfit and conduct a home workout. Bodyweight exercises and abs circuits are excellent if you don't have much equipment at home. If you have resistance bands or weights, use them! Alternatively, don't feel afraid to get creative, a water bottle makes for a great dumbbell substitute. If you're feeling stuck for motivation, play your favourite workout playlist and plan your workout like you do your daily tasks. Ticking exercises off as you go is a great way to feel fulfilled and proud of yourself for getting your sweat on!
This post is part of a paid collaboration with Boux Avenue, and includes commission links.
This blog post was guest featured on The Avenue, Boux Avenue's blog platform, view it here.
This blog post was guest featured on The Avenue, Boux Avenue's blog platform, view it here.
Sunday 12 April 2020
Go-To Peanut Butter Brownie Recipe

These nutty peanut butter brownies are definitely one of my most favourite treats to bake. They're a great surprise for special occasions and fantastic for sharing. Anyone with nut allergies or diabetes must avoid as they do contain peanuts and a whole lot of sugar, but the rest of the party will not be disappointed.
Ingredients
225g crunchy peanut butter
200g dark chocolate
200g dark chocolate
250g light brown sugar
3 medium eggs
100g self raising flour
Optional extras for decoration
Equipment you'll need
1x baking tray
1x medium saucepan
A wooden spoon
Baking paper
Weighing scales
Prep time: 20 mins
Baking time: 35 mins
Oven setting: 180 degrees
Instructions
Firstly, line your tin with baking paper. I cut diagonal slits in each corner of the baking paper (about the same depth as the tin) so that it can be easily folded to fit the shape of the tin. Before you start preparing, be sure to set your oven to 180 degrees.
Put aside 50g of the broken up dark chocolate, adding the remaining 150g to the saucepan, along with the 225g peanut butter and 250g sugar. Heat gently, stirring occasionally until melted. Once melted, take the saucepan off the heat and beat in the 3 eggs. Once fully bound together, stir in the 100g of flour (I always use gluten free flour, it works well for this recipe if you're gluten intolerant too).
Finally, pour out the mixture evenly into your tin and add any extras, including the 50g of chocolate that you set aside earlier. In the batch I made above, I substituted the 50g of dark chocolate for 50g of mini eggs - this is a great adaptation for something different.
Bake in the oven for 35 minutes. When ready, take out and allow the brownies to cool before cutting into squares.

Sunday 5 April 2020
Tips For Working from Home Effectively

Stay as organised as possible
I always begin my working day by writing a list of tasks that I need to work on for that day, prioritising those most important. Doing this allows me to stay on track and ensures that I don't forget any crucial tasks. If I have work that doesn't require me to work in silence, then I'll ask Alexa to pop on my favourite playlist, but only do this if you can still concentrate. Try and start work at the same time each day, having a routine will help you feel productive.
Keep a clean, creative workspace
Don't be shy to invest in cute new stationary as a little motivator to get writing or filing! Writing with a new pen or purchasing new storage folders can make a difference to your day-to-day and help with organisation. Have you ever felt frustrated for losing an important piece of paper? Not anymore! I also would hate for piles of papers to become part of my home interior, so keeping a clean, tidy and organised workspace is highly important.
I live in a one bedroom flat with my partner at the moment, so I've not had the luxury of running off into a private office room to get focused. If you're in the same boat, I would recommend setting up a designated area as best you can. Mine is temporarily at the dining table during working hours, it's not perfect but it works. I also keep a back up area in the living room because every now and again, I have found that having a back up spot or a change of scenery massively helps.
On days I feel particularly unfocused, I'll light a candle on my desk. The comforting scent is pleasant and enables me to settle down far easier than the smell of what we've cooked for breakfast!
It's so important to have the right posture support when you're working in a desk job. Most of us will have specifically designed office chairs or back supports at work so why settle for back problems when working from home? I'd encourage you to look for the most comfortable seating option or even look to invest in a back support for your chair to avoid back problems. I'd also advise stretching your back and neck often when seated for long periods. There are some great yoga stretches out there that will massively help, try googling "desk yoga" for ideas.
Lastly, I'd avoid staying in your pyjamas. I know so many of us will wake up feeling totally sluggish and unmotivated to get dressed when we are home all day long. I'm not suggesting you need to get your heels on and a face full of make up, but I do believe that our brains switch into 'work mode' when we feel like we are in work mode. For me, that's partly wearing clothes that I would normally wear to work, even when I am at home. It also means that you'll never be caught out in your pjs on video conference calls! If I do feel particularly sluggish, then I'll compromise for a casual outfit like a sweater and comfortable jeans. We all have down days, the important thing is to not pressure yourself or feel guilty for it, but to try your best to boost your day instead.

On days I feel particularly unfocused, I'll light a candle on my desk. The comforting scent is pleasant and enables me to settle down far easier than the smell of what we've cooked for breakfast!
Stay comfortable but professional
It's so important to have the right posture support when you're working in a desk job. Most of us will have specifically designed office chairs or back supports at work so why settle for back problems when working from home? I'd encourage you to look for the most comfortable seating option or even look to invest in a back support for your chair to avoid back problems. I'd also advise stretching your back and neck often when seated for long periods. There are some great yoga stretches out there that will massively help, try googling "desk yoga" for ideas.
Lastly, I'd avoid staying in your pyjamas. I know so many of us will wake up feeling totally sluggish and unmotivated to get dressed when we are home all day long. I'm not suggesting you need to get your heels on and a face full of make up, but I do believe that our brains switch into 'work mode' when we feel like we are in work mode. For me, that's partly wearing clothes that I would normally wear to work, even when I am at home. It also means that you'll never be caught out in your pjs on video conference calls! If I do feel particularly sluggish, then I'll compromise for a casual outfit like a sweater and comfortable jeans. We all have down days, the important thing is to not pressure yourself or feel guilty for it, but to try your best to boost your day instead.
Wednesday 1 April 2020
How to Bake the Blogger Favourite Banana Bread


Baking a banana bread from scratch is actually super easy, and it's much less daunting than it originally sounds. Since sharing my banana bread bake over on social media, many of you requested the recipe that I've relied on time and time again. I couldn't wait to type it out for you!
I'm a firm believer in baking therapy, it shouldn't be stressful and it doesn't need to be. There's nothing more satisfying than creating something from scratch and watching it be enjoyed by those you choose to share it with. This recipe isn't too unhealthy either, compared to your average victoria sponge or chocolate cake, this plain banana loaf is a much less sugary and less fatty alternative!
Ingredients
2 over-ripe bananas
120g plain flour
30g brown sugar
60g butter (room temp if possible)
1/2 tsp baking powder
1/2 tsp baking soda
2 tbsp milk
1 egg
Sprinkle of salt
100g dark chocolate (optional)
Equipment you'll need
1 x small loaf tin
Baking paper
2x mixing bowls/containers
Weighing scales
Prep time: 15 mins
Baking time: 25-30 mins
Oven setting: 175 degrees
Firstly, allow your oven to heat up by switching it on and setting it to 175 degrees. Line your loaf tin with baking paper to prevent your banana bread from getting stuck. Using one of your mixing bowls, combine together the plain flour (120g), baking powder (1/2 tsp), baking soda (1/2 tsp), and a sprinkle of salt until nicely mixed. In the spare mixing bowl, cream the butter (60g) with the brown sugar (30g). Next, mash up your two bananas with a fork and add them to your butter and sugar mix, along with the milk (2 tbsp) and the egg. Stir together until nicely combined, then add it to your flour mix. If you choose to add dark chocolate to your bread, then make sure to break it into squares and add it at this stage. Once you're happy that everything is nicely combined and there's no lumps of flour, pour evenly into your loaf tin.
I'd recommend baking for 25-30 minutes for a moist banana bread.
Do let me know if you give this recipe a go, and be sure too share a photo too!

Saturday 14 March 2020
A Full Face of Makeup | Urban Decay 'Naked Honey' Eyeshadow Palette

Since the first palette launched in 2010, Urban Decay have since launched seven twelve shade 'Naked' eyeshadow palettes. After a decade of these popular palettes, I thought I'd pull together my thoughts on the latest Naked Honey set of shades, alongside a very wearable makeup look that you can achieve at home.
As a perfect curation of classic golds, warm ambers and rich chocolate browns, this palette will suit any eye colour. At a first glance, I definitely had my favourites: Flyby, Sweet, Hive, and Hbic. However, as I've used the palette more and more, I've developed an individual love for how each and every shade can create a different look. From sweet summertime honey to a sultry smokey eye, the Naked Honey palette oozes experimental creativity and is everything you want as a beauty fan.
Get the look
With a warm day-to-night look in mind, I strived for makeup that tied modern glamour with subtle sophistication. I started with a strong base of the Collection Lasting Perfection foundation and concealer, to which I then added my favourite bronzer - the Hoola bronzer by Benefit. When seeking a glowing skin look, I'll always add a good dose of highlighting powder to the bridge of my nose and my upper cheekbones. This emphasises your bone structure and gives the appearance of healthy, well hydrated skin. To warm the apples of my cheeks with a flush of colour, I swept the Mary Kay 'Shy' blusher in circular motions using a kabuki brush.
Now to the nitty gritty of my eye makeup! I've got into the habit recently of not really fussing with my eyebrows. I've actually been really lazy with plucking, but that's another story for another day. For this look, I brushed my eyebrow hairs in an upwards motion with a mini spoolie brush. Brushing upwards will provide an instant lift and achieve that supermodel fluffy brow look that's everywhere at the moment.
Starting with a base colour for my eyeshadow, I applied the palette shade 'Sweet' across the whole eyelid, taking it right up to the eyebrow. I usually start with a natural nude shade to allow the pigments to blend nicely with my foundation. Next, I applied the shade 'Swarm' to set the tone for the warm amber look that I was striving for. Along the eyelid crease and underneath my lower lash line, I applied 'Hive' to define and deepen the pigment.
Emphasising the drama without harshening the look, I added a small amount of the darkest tone, 'Sting', to the outer corners of my eyes. In contrast, I used the lightest tone in the palette, 'Flyby', to highlight the inner corners of my eyes. I find that applying a highlighting shade in this way enhances the whites of your eyes, making them appear brighter and more awake. Similarly, adding a nude eye pencil to your waterline has the same effect.
For me, eyes wouldn't be complete without a lashing or two of black volumising mascara. Before application, I always curl my eyelashes. It's become a lash ritual. For this look, I used the Rimmel London Volume on Demand mascara in Black.
I purposely didn't go heavy on my lip makeup because I wanted my eyes to be the main feature. I normally stick to lipstick, but for a sparkling alternative, I decided to use some plumping lip gloss by Soap and Glory. Prior to applying the lip gloss, I softly defined my lip shape by smudging in a MAC lip liner in the shade 'Soar'.
I've added shoppable links to most of the 'Naked' eyeshadow palettes at the bottom of this blog post. Be sure to click through, if you'd like to see the colour differences and shades for yourself.

This post includes commission links.

Shop the look

Sunday 9 February 2020
The Outfit Inspired By the 90s


Nothing screams 90s fashion like a fitted shirt and a tan shoulder bag. As a 90s baby, I felt naturally at home with this look. It's totally Monica Geller from F.R.I.E.N.D.S and I absolutely love it. You'll often find me swamped in oversized jumpers, so it was a refreshing change to wear something a little more tailored and flatteringly pinched in at the waist. As for the tan handbag, I adore the rectangular shape and the ease of flinging it over the shoulder for a chic look, whilst only carrying your bare essentials.
Now all I need are some cat eye sunglasses and Sex and the City on VHS.
Shop the look
This post contains gifted clothing and affiliate links.
Wednesday 22 January 2020
How I Style the Printed Blouse

The printed blouse - normally it's an item of clothing that lots of us would shy away from, but with the right styling, there is no reason to be scared. When I saw this monochrome animal print blouse pictured online, I couldn't shut down my computer without putting in a cheeky little order. With a high neck and ruffled sleeves, this blouse is the perfect example of an item that could be easily styled as casual or workwear. With this look, I've opted for an in between with the classic (nobody knows what it means) smart casual.
I would suggest to pair any bold prints with one similar colour for a full outfit. Here, I have picked out black as a core colour choice, wearing it with my black skinny jeans, black faux leather jacket and black biker boots. Partnering the printed top with a solid colour will draw more attention to the pattern, and avoid any clashing print partnerships.


I would suggest to pair any bold prints with one similar colour for a full outfit. Here, I have picked out black as a core colour choice, wearing it with my black skinny jeans, black faux leather jacket and black biker boots. Partnering the printed top with a solid colour will draw more attention to the pattern, and avoid any clashing print partnerships.
Shop the look
Saturday 11 January 2020
Product Review: Mac Honeylove Matte Lipstick
 It's been years since my last beauty product review blog post, but I figured it was time to get back to basics for the products that I love the most with this good old fashioned style of blogging. Whenever I'm looking to purchase new beauty products, I tend to always do my research online, mostly to see what the shade looks like on a blogger with a similar skin tone to me. Since the popular surge of matte lipsticks began a few years back (thanks Kylie Jenner), I trialled a few but there's only ever been one standout matte lippy that I always rely on.
I originally purchased the MAC Matte Lipstick in shade 'Honeylove' as a dupe for the sold out at the time lipstick shade, 'Velvet Teddy'. Since trying out both, I can now say 'Honeylove' wins every single time for me.
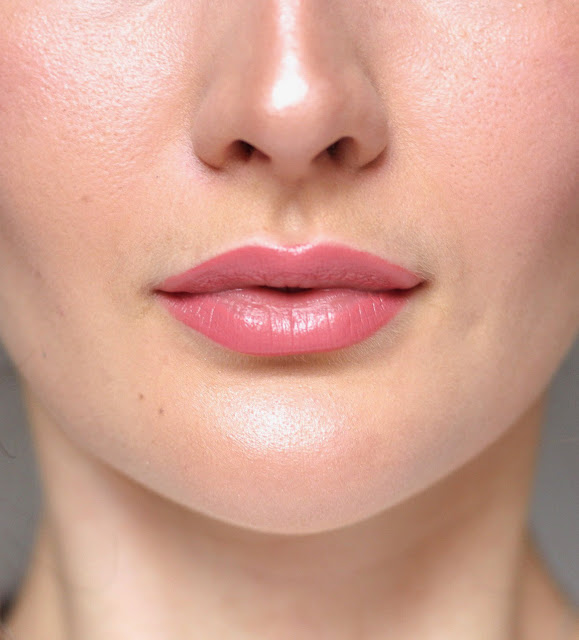
I would describe this lipstick as the perfect nude. It's classic and timeless, with a modern matte twist. It's not too light, and it's not too dark. It's complimentary to a lot of tones because of its perfect peachy base.
On the formula side of things, we've all been there with crumbly matte lipsticks that leave your lips dried out and sore, but not this time ladies! This is one of the most comfortable matte lipsticks that I have worn. I typically partner it with the MAC lip liner in the shade 'Soar', meaning it doesn't budge or feather. Upon application, it's soft and silky, just how a lip product should be.
I'd buy this colour time and time again. It's an essential in my makeup bag now, and a favourite of mine for the last three years. As you can see below, it pairs well with a neutral smokey eye and fluffy brows for a elegant look.

Stay in touch!
Instagram - @evieroselane
Pinterest - @evieroselane_
Shop the look:

This post contains affiliate links
Monday 30 December 2019
New Year Reflection | The 2019 Edition

This time last year, I wrote a post entitled New Year Reflection. I took the opportunity to look back on 2018 with a smile as I praised myself for my successes and experiences from the year. As I sat reading through the blog post this morning, I felt pleased that I had recorded my thoughts and views at the time. In the post, I asked you, my readers, some reflective questions that you could try out at home to reflect on your own year. As 2019 is now coming to an end with the new year beginning in just a few days, I thought I'd reflect again and ask myself those same questions that I had asked you.
One obvious lifestyle change comes to mind here as I changed jobs back in April. Unfortunately, the job I was in at the time was no longer suiting my needs. It took great strength to walk away from, and at the time it was a situation that caused me great stress. Rather than looking back upon the negatives that I associate with the reasons for the job change, I'm so proud for standing up for myself and doing what I knew I had to. All my life, I have been terrible at putting myself first. I finally learned that the person who will have your back most should always be you. I kept a similar role as a Digital Marketing Executive, but I now work for a bigger company with a bigger team around me.
"I finally learned that the person
who will have your back most
should always be you."
In my private life, I have been a supportive girlfriend this year to my partner of three and a half years, Ben. Ben decided at the start of the year to begin bodybuilding competition prep after years of weight training and working as a personal trainer. I've not known dedication like I have witnessed from Ben this year, and his hard work paid off for him. Living together, our meals were all completely separate, with him prepping about six meals a day. Eating treats in front of him was truly quite awful! It's difficult to understand unless you're in the fitness industry, but I am glad that I had the understanding to support him through his journey. It was tough, but we did it, and now we enjoy our meals out and cinema snacks even more than ever.
Our summer holiday to Cape Verde, just before my 23rd birthday, was one of the most enjoyable experiences for us this year. Ben and I had a wonderful time, sipping Pina Coladas on the hotel beach and soaking up the sunshine. The trip struck a chord with me, mostly for the island's "no stress" motto. The people seemed so carefree and friendly, with "no stress" written everywhere you looked. I recall it being the most calm that I had felt in months, apart from the aeroplane taking off and landing! The excursions that we went on included paddling with lemon sharks (that was an experience that I will never forget), and a day trip around the island where we tried their traditional honey rum, saw what the island had to offer and learned about its history. Every time I now hear Bob Marley songs, I can feel myself bobbing about in the back of the mini van singing along as we toured the island with our guide.
"I recall it being the most calm
that I had felt in months..."
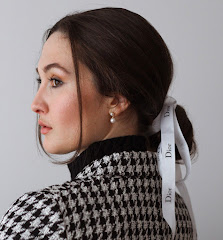
On the blog front, 2019 brought some wonderful opportunities for me. I have collaborated with many fantastic brands this year on EVIE ROSE LANE, but working with Dior was a collaboration that I will never forget. Everyone has one brand that they dream of working with, so when I got the email about their makeup campaign, it was a real pinch me moment. I tried to capture the luxurious sophistication of the designer within my content, the same sophistication that I had seen a few months prior in the Christian Dior: Designer of Dreams exhibition at the V&A. Taking my time with the photography, styling each beauty flatlay delicately and creatively, I was really proud of the work that I had created.
Generally speaking, I've invested time and attention into improving my photography and highlighting sophistication within the style of my content. I want to capture the beauty of the everyday, whether that be your morning skincare cleanser or a new jewellery piece that you want to show off. Looking forward, I'm hoping to include more fashion within my content, but not fast fashion. I'm keen to show experimentation with timeless items that are made to be worn time and time again, not once for a one off.
Generally speaking, I've invested time and attention into improving my photography and highlighting sophistication within the style of my content. I want to capture the beauty of the everyday, whether that be your morning skincare cleanser or a new jewellery piece that you want to show off. Looking forward, I'm hoping to include more fashion within my content, but not fast fashion. I'm keen to show experimentation with timeless items that are made to be worn time and time again, not once for a one off.
"Everyone has one brand that they dream
of working with, so when I got the email
about their makeup campaign,
it was a real pinch me moment!"
Stay in touch!
Instagram - @evieroselane
Pinterest - @evieroselane_
Shop the look:


Sunday 17 November 2019
How I Beat Gym De-motivation


Whatever your reason may be for missing out your workouts or for ghosting your exercise class, there's a number of ways that you can help yourself get back into working out and beat that gym de-motivation. Firstly, let's not go down the rabbit hole of feeling guilty for what we may have missed. Sometimes life, and even health, can get in the way. I'm a firm believer that you need to do what is best for your body at that moment in time, and you'll probably find that a little bit of rest is exactly what you need.
When I've previously had time off from the gym, I almost forget the feeling that it gives me. Even after just one session back in the weights room, I am instantly reminded of the unbeatable endorphins and the reasons why I started training in the first place. There is nothing like the feeling of pushing yourself to achieve, and actively taking part in something positive for you and your body. I always encourage others to think of the rewarding feelings post-workout, instead of the procrastination before starting one.
If you find yourself struggling to pick up the courage to walk into the gym alone, it may help you to try going to the gym with a friend, a family member, or your partner. Having the support of the other person, and also being encouraging to them in return, will help you realise that you're not alone if you're feeling self-conscious or worried. With the addition of a popular playlist, a busy gym will turn into the perfect activity for you and your new gym buddy.
Procrastination can be an absolute pain when you're trying to commit yourself to a time to get back into the gym. There's nothing like a signed and dated commitment when you're struggling to tie yourself down. Booking a group class or a session with your favourite personal trainer will make you far less likely to cancel last minute. If you cancel, you'll be letting others down as well as yourself, and if you're anything like me, that will feel awful enough to make you get going!
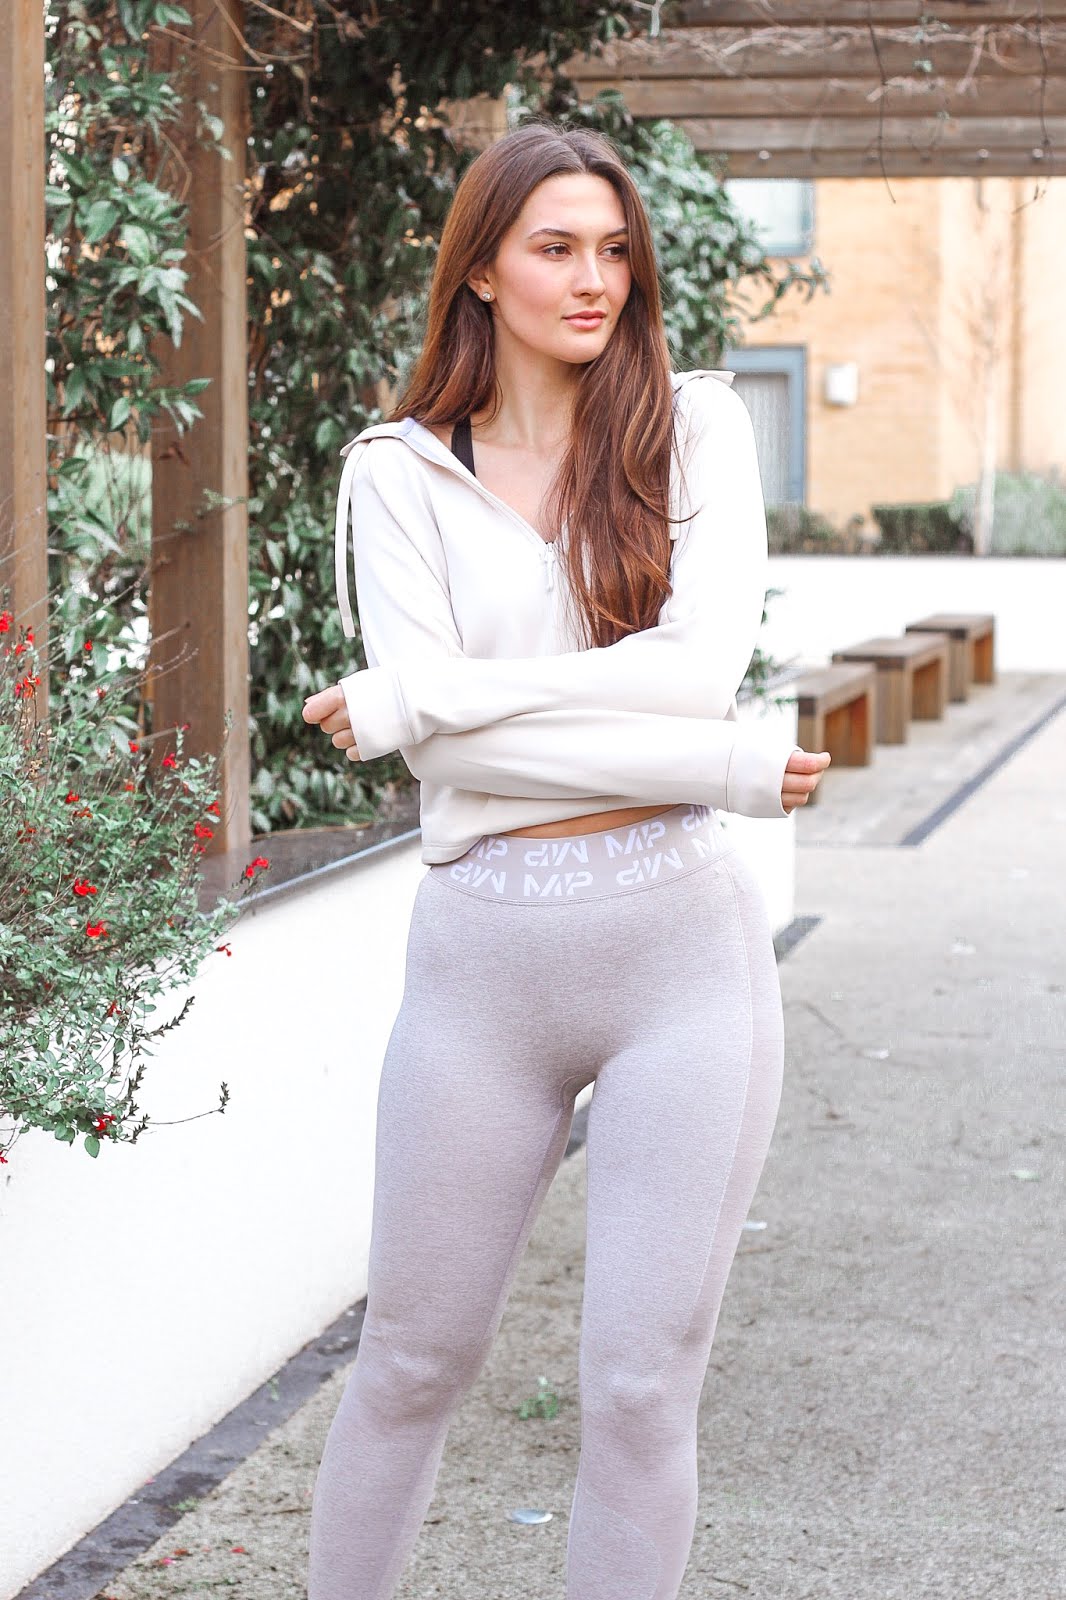
Lastly, my favourite tip of all. Give me any excuse to go shopping and I'll be there, it's time to update your gym wardrobe! There is such a thing as buying a new dress and feeling a surge in confidence once you put it on. Well, it works just the same for new activewear. Find something that you feel comfortable and confident in and you'll feel a lot more motivated to get your sweat on! In this post, I'm wearing figure shaping leggings that were kindly gifted from the new MyProtein Curve collection. A comfortable and stylish pair of gym leggings can be hard to find (especially if you're on a budget), but at £32 these are ideal. While available in four different colours, I chose the very on-trend sesame style. In a seamless design, the leggings optimise comfort and flatter the natural curve of your body. The thicker branded waistline is elasticated and super soft, providing a clever illusion of a smaller mid-section while covering the belly button for a high rise fit. With subtle two-tone shaping patterns that have been specifically placed, you can say hello to that bottom you've always wanted!
Shop the look

Disclosure - This post contains affiliate links and PR product.

Instagram - @evieroselane
Pinterest - @evieroselane_
Sunday 3 November 2019
A Full Face of Makeup | The Subtle Smokey Eye


As a brunette myself, smokey eye makeup is always marketed towards me, but it has resulted in far more makeup disasters than I would have ever expected. I've always been a fan of the idea, but whenever I have attempted it previously, it resulted in more of an undesirable bewitched look. I have found that the darkness of a typical smokey eye can be harsh against my dark features so I've been on the hunt for a eyeshadow look that works for me. Finally, after a little experimentation and getting to know what compliments my facial features, I've mastered the perfect subtle smokey eye makeup.
Today, I'm taking it back to the old school days of beauty blogging. The days where you'd experiment with a new makeup style in your bedroom, then quickly snap pictures to share a review online. So here we are!
Beginning with a flawless base, I used the Dior Backstage Face & Body Primer with the Dior Backstage Face & Body Foundation in my shade 1,5N. Due to the light formula of this foundation, it's very easily blended in with just a beauty blender sponge. I find this one of the most comfortable foundations to wear. It's weightless and completely non-sticky, without compromising on a fantastic coverage. I added the E.L.F 16hr Camo Concealer to conceal any areas of redness or blemishes. This concealer is of a fairly thick consistency, therefore it works well to mask uneven pigments. However, it does dry a little darker than when you originally apply the product. With this in mind, I use a separate concealer to conceal under my eyes. I religiously use the Collection Lasting Perfection Concealer on an everyday basis. In fact, it's been one of the only products that I have re-bought and re-bought over the years - I remember using it when I first started testing out makeup as a curious 14 year old. Here I have used the fair shade, deliberately on the lighter side of my usual shade match, to brighten up my under eyes for a more alert look. It's my favourite way to wave goodbye to those pesky dark circles!
For an extra glow, I applied a small amount of Dior Backstage Face & Body Glow to my upper cheekbones, along the bridge and the tip of my nose, onto my chin and cupid's bow. On top of this, I swept a light dust of golden highlighting powder to enhance the look of my skin and aid the contour of my face. I then added further definition by applying the all time favourite, the Benefit Hoola Bronzer. I contoured with this product using an angled brush for an easier application. With this product, I added shade to the sides of my nose, beneath my chin and under my cheekbones for a structured yet subtle look.
For my brows, I'm enjoying the natural look currently. Since I have grown them out, I tend to just brush them in an upwards motion with a simple spoolie brush. Grooming the hairs upwards flatters the facial features, almost like a natural face lift if ever there was one.
One of my favourite eyeshadow palettes of all time is the Urban Decay Naked 3 Palette. If I were an eyeshadow palette, I think this would be it. With subtle golds, mauves and gorgeous browns, all of the shades flatter my dark tones perfectly. To create my smokey eye look, I initially covered my eyelid with the shimmering brown shade, Mugshot. With a flatter eyeshadow brush, I then gently applied the well pigmented gold shade, Buzz, under my lower lash line, flicking it outwards at the outer corner of my eye. Using my little finger, I tapped a small amount of the light cream shade, Strange, to the inner corner of my eyes. This softens the smokey eye, giving a brighter effect and complimenting the whites of your eyes, instead of dulling them out. I deliberately kept the eyeliner fairly minimal with this look, using a simple elongated winged line to add definition to my upper eye lid. To do this, I used the incredibly easy to apply Mary Kay Liquid Eyeliner Pen. Finally, to complete my eye makeup, I curled my lashes and carefully applied two coats of the Benefit They're Real Lengthening Mascara.
Complimenting the smokiness of my eye makeup, I decided to go with a blossom pink shade for my lips and blusher. Using a blusher brush, I gently dabbed the blusher upon the apples of my cheeks. To prepare the lips for my lipstick, I initially line them using the Mary Kay lip liner in the shade Coral. Lining the lips prior to lipstick not only defines the shape of your lips, it also prevents your lipstick from smudging. Additionally, it acts as a great base colour to enhance the final product's pigment. I often gravitate towards subtle nude lipstick shades but every now and again, I like to switch it up with a bolder choice. Accompanying my smokey eyeshadow today is the Charlotte Tilbury K.I.S.S.I.N.G lipstick in shade The Duchess - an elegant favourite! This burst of colour lifts the look as a whole, converting it from a smokey eye attempt to glamorous photo-ready makeup.
Shop the look

Instagram - @evieroselane
Pinterest - @evieroselane_
This post contains affiliate links
Subscribe to:
Posts (Atom)