FLORISTRY
Monday 18 October 2021
How to Create a Pumpkin Flower Arrangement for Halloween


If like me, you'd prefer to opt for a prettier take on pumpkins at Halloween rather than frightening ghosts and ghouls, you've come to the right place. In this post I'll guide you through how to create a pumpkin flower arrangement like the one I've made below.
What you'll need
- A large pumpkin
- A knife for carving
- A pencil
- A bowl
- Autumnal flowers
- Floristry scissors
- Floristry oasis
How to create your floral pumpkin arrangement
- First you'll need to prep your pumpkin. Ensure your flowers are kept in cool water while you're doing this so that they stay hydrated. You'll need to carve the top off of your pumpkin, you could choose to do this in a curved line or in a zig-zag fashion. I've chosen a curved line for this particular pumpkin. To get a precise line, turn a bowl upside down over the top end of your pumpkin, draw around the edge of the bowl with a pencil, then remove the bowl. Now you have a nice neat line to use as a guide. Stick your knife in and out of the pumpkin to make the first cut, and repeat this process until you've cut all the way around. You should now be able to pull the top off so it becomes the lid.
- Using your hands or a utensil, empty out the contents of the pumpkin as best you can. Put the seeds and flesh to one side in a bowl so that you can make the most out of them later in recipes. Meanwhile, measure out the size of your floristry oasis. This will be sitting inside your pumpkin, so it needs to be able to fit comfortably. Soak your floristry oasis in cool water in the sink so that it absorbs all the moisture.
- Once it's fully absorbed, put your oasis block into the inside of your pumpkin. This will be holding your flowers in place and providing them with the water they'll need to keep them looking good.
- Prepare your flowers by splitting them into types. For example, put all your red roses into one section, pink in another, and foliage in another. Strip off any leaves that will not be visible or will get in the way of your arrangement. I like to keep a few of the top leaves to bulk out the arrangement and keep it more natural but this is entirely up to you.
- Measure your first flower stem down to size by carefully snipping at the bottom of the stem a few cm at a time. Gently insert the stem into the oasis until it stands alone, is secure and sits at the desired height above your pumpkin.
- Build out your arrangement around the first stem by considering colours, textures and varying heights. You can also try inserting the stems at a diagonal angle so that some of the flowers elegantly hang over the edge of the pumpkin, disguising the raw edge from sight.
- Once you're happy with how it looks, pop it on display on your side table or even as a centre piece at the dinner table while you enjoy a comforting autumnal feast.


Sunday 6 December 2020
How to Decorate a Christmas Wreath

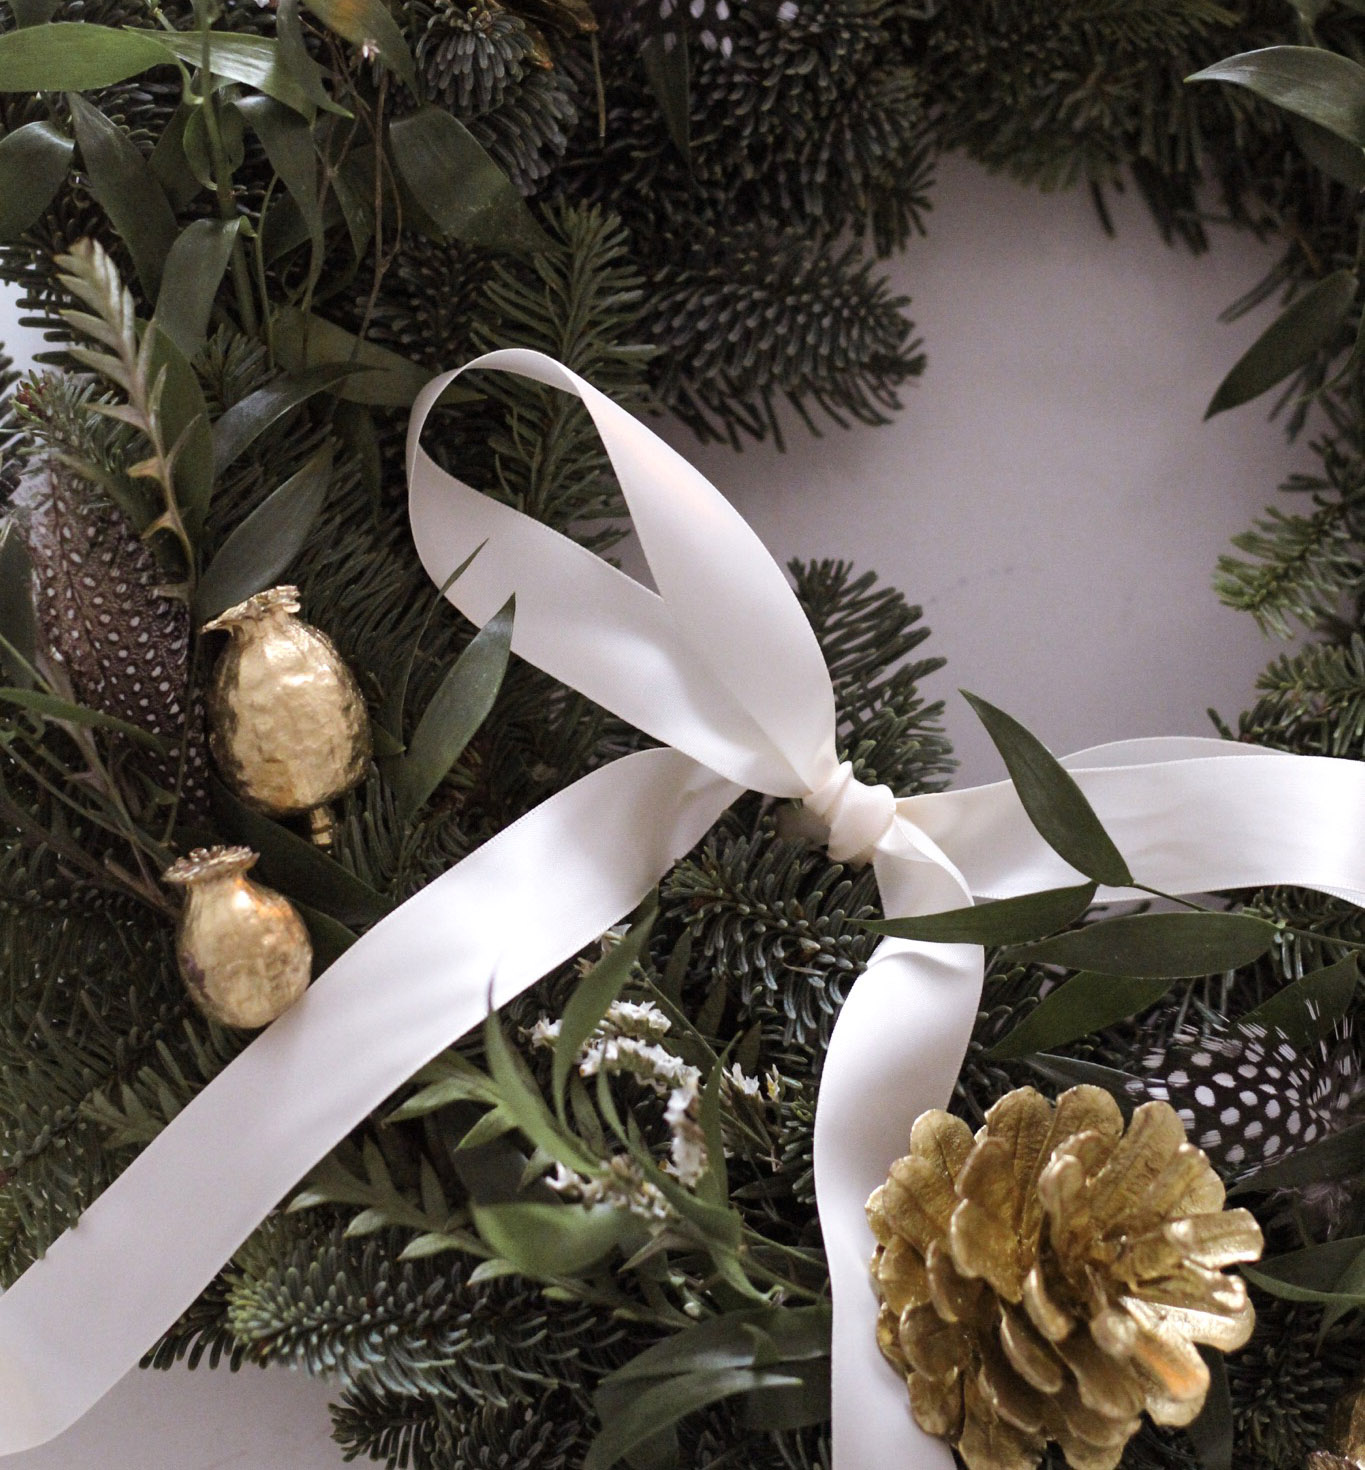
For the first time this year, I got stuck in and decorated my own Christmas wreath. Despite the perfectionist in me, I found it surprisingly straight forward and effective. Having a hand in the creation process and personalising it myself certainly made it even more special too.
HERE'S HOW TO DECORATE A CHRISTMAS WREATH...
Ad - This post features affiliate links and PR products. Find out what this means here.
You'll need:
- A pack of thin wire (like this)
- A pre-prepared wreath base or wreath kit (I got mine from Bloom & Wild, get £10 off your first order here.)
- Items for decoration
- A bunch of mixed foliage
- Ribbon (I used this one here)
- Floristry scissors (like these)
1. Firstly gather up all your decorative items and separate them into clear piles by type. I used gold sprayed seed heads, pinecones, guinea fowl feathers and a collection of different foliage for mine!
2. Trim your foliage into sprigs around 3-6 inches long in length. You can bunch 2 or 3 sprigs together or keep them separate.

3. Next take one wire and tie it around the base or stem of your decoration. Leave one end of wire two thirds longer than the other and twist the shorter end around the remaining wire so it's neatly concealed. If you're using feathers like me, you should be able to poke these in without needing wire.
4. Placing your wreath on the table in front of you, position the first foliage or decoration pointing clockwise. Once you're happy with the position, feed the wire through the back of your wreath, fixing it around the back with the remaining wire.

5. Carry on adding your decoration and foliage around your Christmas wreath. A good tip is to add your decorations pointing the same direction and evenly space out the different types.
6. Finally tie the ribbon in a bow on the top or bottom of your wreath. You can also tie a smaller length of ribbon in a small hoop at the top on the reverse side to hang your wreath to the door or wall.
If you gave wreath decorating a go after this post, let me know in the comments or tag me at @evieroselane on Instagram!


Friday 28 August 2020
How to Make a Flower Crown

What you'll need:
- Flowers & foliage (I used "The Maya" by Bloom&Wild)
- Wax floristry tape, like this
- Wire, like this
- 1 metre of ribbon
- Scissors
Step by step guide:
First, measure your wire on the front of your head like a headband, leaving an inch or two behind your ears. Bend each end into loops, big enough for your ribbon to be tied through. Cover any sticking out wire by wrapping your floristry tape over the join. Layer the floristry tape at a 45 degree angle when wrapping, working down the wire as opposed to layering it directly on top of itself.
In preparation for adding your flowers, tear off pieces of floristry tape at about an inch or two in length. Start cutting the tops off of your foliage and flowers that you wish to incorporate into the crown, but be sure to leave a few inches of stem and don't cut them too short. Sort your flowers into piles by type, then choose your first piece of foliage. Hiding the wire loop, attach the foliage to the end of your crown using one of your teared pieces of tape. Next put together a small bunch of two and attach this to the wire, slightly downward from your first attachment. Each time you add a new piece, try to add in a left, right formation so that your flower crown is beautifully balanced.
Once you've reached the end of your flower crown, be sure to add a piece of foliage in the alternate direction to conceal the second wire loop from sight. Cut your ribbon in half, and tie each piece of ribbon at either end of your crown. Take your crowning moment and tie your flower crown on your head. Ta-dah!
Tag me in your floral crown creations on Instagram @evieroselane #bloomsbyevie

This post contains affiliate links.

Tuesday 16 June 2020
My Care Tips for Cut Peonies


From buds to blooms
Before they go for another year, I thought I'd pull together my top tips for how I get the most out of my cut peonies. If you've bought or grown peonies before, you'll know they begin as tightly formed buds, typically covered in a little sap. Within a few days, they'll begin to blossom into big bountiful blooms and give you the biggest surprise. Peony buds can actually expand 3x the size of the bud once fully opened up. Don't worry if the buds have a few dark spots or look a little stained, this is completely normal. You can encourage your buds to open if you're growing impatient by gently wiping the sap off with a damp cloth and placing in a warmer sunnier spot.
Keep them for longer
Although stunning, peonies tend to last for around 5 days or more once cut and placed in an arrangement. To help your peonies last longer, keep them cool in cold water when you first bring them home or cut them from your garden. Prepare them for arranging by stripping the leaves below the waterline or further up depending on your desired style. Cut the stems 3-5cm from the bottom in a diagonal chop. This will help the peonies absorb more water as soon as they get put into the vase. After three days, trim the stems down a few cm again and top up the water. Remove any petals that may look brown, dead or mushy as these will rapidly encourage your peonies to go over.
Clean vases for happier blooms
Ensure you have a clean vase ready as any bacteria may cause the peonies to die off quicker than normal. Fill your vase with cool water and mix in flower food to give the flowers the best chance for surviving indoors for longer.
Where to buy?
You could partner your peonies with other flowers, such as roses, lisianthus, or freesias for a seasonal bouquet or enjoy them as a stand alone statement. You can usually buy peonies in the supermarket with your weekly shop but if you're currently unable to go due to the lockdown rules, you can also order them as letterbox delivered flowers online from websites such as Bloom&Wild. For £10 off your first Bloom&Wild order, click here.

This post includes affiliate links.
Saturday 14 September 2019
How to Keep Cut Flowers Fresh

If you’re passionate about flower arranging like me then you’ll understand the frustration of creating a beautiful and time consuming arrangement for it not to last more than a few days. I’ve collected the best tips to ensure that you give your cut flowers the best chance of staying fresher for longer. You’ll be pleased to know that none of these tips take much time and have a very, very low difficulty rating!
Let’s begin with preparation. Preparing your flowers for arranging is something that many people overlook to begin with. Once cut, it is important to avoid your flowers losing too much water. As soon as I get inside, whether the flowers have been cut or purchased, I ensure that I trim the stems very slightly at a diagonal angle. Cutting the stems diagonally increases the flower’s ability to drink water, making them hydrate quicker. Don’t take too much off here as it may cause a dilemma later on when you trim your stems to fit your vase! Remember, you can’t go back if you cut the stems too short.
It is recommended that you keep the flowers in a cool environment when storing so that they don’t lose too much water. If you grow your own flowers, you could try cutting your flowers at a cooler time of day, such as early morning or lighter evenings. This will give your flowers the best chance of holding water as they won't have dried out in the daytime sun.
To prepare your flowers for the vase, remove any leaves that will appear below the waterline. If left, wet leaves will start to rot and cause bacteria to grow within the vase. Any bacteria in your vase will cause your flowers to wilt or rot. Therefore, it's very important to keep your containers clean. Make sure that your vase is kept clean and water is replaced every other day to keep your cut flowers fresher for longer.
Prior to arranging, be sure to fill your vase with two thirds of water. You can also mix in a sachet of flower food. Flower food is essentially a formula created to prevent bacteria from growing in your vase. Typically, you’d expect to find a little pouch of flower food with your flowers if you purchased them. However, with cut flowers you may wish to make your own. As with most things, there are plenty of homemade remedies and recipes for “flower food” that you can try at home, but to keep things easy I’ll begin with just this one: add 1 tablespoon sugar + 1/2 teaspoon bleach and mix it into the vase water.


Follow me on Instagram @evieroselane
Subscribe to:
Posts (Atom)